Helical processing
Introduction
Helical processing in RELION closely follows the procedures normally applied for single-particle analysis. Therefore, if you are new to RELION, it is highly recommended that you first go through the tutorial. A paper about the details of helical processing in RELION is now available on JSB ScienceDirect. Below is an overview of specific parameters and issues with helical processing in RELION.
(Please note that GPU acceleration is applicable in 3D reconstructions of 2D helical segments. While 3D sub-tomogram averaging with helical parameters is currently under development.)
Description of parameters
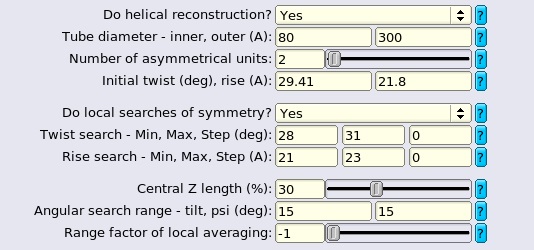
Helical symmetry
A detailed explanation of helical symmetry in RELION can be found in the paper.
The symmetry of a helix depends on the helical twist, helical rise and the point group symmetry (e.g. Cn or Dn). Helical twist should fall in the range of (-180°, +180°) with the sign denoting the handedness (+ and - for right- and left-handed helices respectively). Helical rise should always be positive (>0.001Å and >0.001 pixels). The entire helix can be formed by rotating (according to helical twist) and translating (by helical rise) individual subunits.
Particle boxes and masks
One major difference between helices and single particles is that the former ones span arbitrarily long along their helical axes.
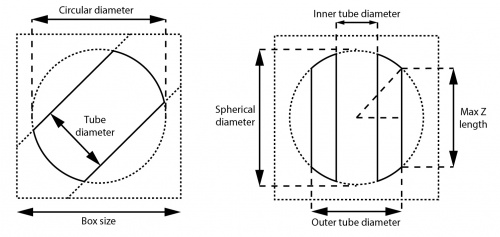
The sizes of particle boxes and masks should be given careful consideration before the start of a project. In RELION, particle boxes are always 2D squares or 3D cubes. Very large box sizes should be avoided in 3D jobs since they may cause memory problems.
You may want to measure the width of filaments before thinking about the box size for 3D reconstruction. Usually the width can be observed from raw micrographs, or you can perform 2D classification with a large enough tube diameter (but still smaller than the size of the circular mask) and measure the widths afterwards from classes with clear contours. The tube diameters in auto-picking, particle extraction, 2D classification and the outer tube diameters in 3D classification and refinement should be slightly larger than the actual widths of filaments since the diameters are used for normalisation and/or masking. It is especially important in 3D reconstructions otherwise the signals at the periphery of the helix will be masked out with tight cylinrical masks.
Box sizes of ≥1.5× the tube diameter is commonly adopted for 3D helical reconstruction while bigger boxes are sometimes better for generating 2D classes for template-based auto-picking or Fourier-Bessel analysis. If the box sizes are too small compared to the actual width of filaments, segments will fill the entire boxes and lead to inaccurate alignments or incomplete reconstructed maps. However, you may still want to use box sizes ≥200 pixels even if the helices have widths of, for example, only ~50 pixels, to include more subunits into the reconstructed map and get more accurate alignments.
The circular/spherical (background) diameter must be smaller than the box size and larger than the tube diameter. In addition to normalisation and masking out noises, these soft-edged circular/spherical masks also have the effect of reducing Fourier artefacts caused by the presence of helical structures near the box edges in image transformations. We usually set it to ≤90% of the box size. The default value for single particle analysis is 75%, but for helical processing this might be a waste of space (and thus memory).
The inner tube diameter in 3D reconstruction masks out the center of the helix and may improve the resolution for some cases during refinement. The value should be strictly smaller than the (outer) tube diameter and the inner mask is not applied if the value is set to negative. It can be set to positive only if you are certain that the structure is hollow in the center, or has something which does not conform to the helical symmetry (e.g. DNA on which the subunits are bound to). We suggest performing 3D refinement without the inner mask if the structure is not well-known.
In 3D reconstruction, the box size, outer diameter and circular/spherical (background) diameter together define the maximum value of the central Z length parameter, which is √(spherical_ diameter2 – outer_diameter2) / box_size. This central part of the map is used for searching and applying helical symmetry in real space. Its length along the Z axis is usually set to default 30% of the box size. This length must also be larger than 2× the helical rise (or the upper limit thereof when searches over the rise are performed). Our preliminary experiments show that for well-ordered helices, the exact value does not seem to affect the final resolution to a large extent. However, one may want to play with this parameter for helices that are flexible, have unknown helical parameters, or large helical rises.
Inter-box distance
Individual particle boxes will be extracted from helical filaments in the micrographs with overlapping segments. The user defines the amount by which subsequent particles overlap through the number of asymmetric units parameter. This parameter will result in an an inter-box distance of the number of asymmetrical units × the helical rise. Thereby, if one specifies to have a single asymmetric unit in each new box, the inter-box distance will be one helical rise, and each new box will contain a single new asymmetric unit compared to the previous box. Note that the interbox distance should not exceed (1 - central Z-length)×box-size/2.
Particle picking
Manual picking
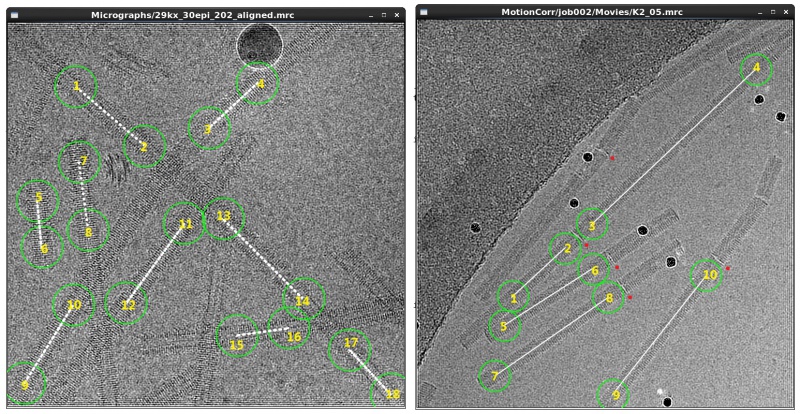
Manual picking is applicable when the helical filaments are straight. It is often used to generate an initial data set, which is then used to generate templates for auto-picking. To pick helical tubes manually, run a manual picking job from the GUI with ordinary settings and subsequently left-click start- and end-points of filaments, on every micrograph. Helical segments will then be extracted along straight lines between the selected pairs of points in the particle extraction step, so you should only choose the straight parts of the filaments.
Pick the coordinates as accurately as possible, especially if you plan to use the resulting particle boxes for a final 3D refinement. It may help to set the diameter of picking circles to be approximately the same size as the width of the helical filaments. Intersections of filaments must be avoided because density of crossing segments greatly affects alignment. Moreover, a filament with clearly visible discontinuities should be picked as multiple ones. For example, disks which break the helical symmetry are clearly seen on long TMV tubes. Note that this type of filaments cannot be properly handled with template-based auto-picking.
The resulting coordinates will be written out in Tube coordinate files in RELION (*.star) format with the following syntax (ignore comments after //):
data_

loop_
_rlnCoordinateX #1
_rlnCoordinateY #2
  110.000000  1080.000000   // Tube 1 starting coordinates x, y
 1855.000000   585.000000   // Tube 1 end coordinates x, y
  635.000000  1325.000000   // Tube 2
  560.000000  2490.000000
...
Auto-picking
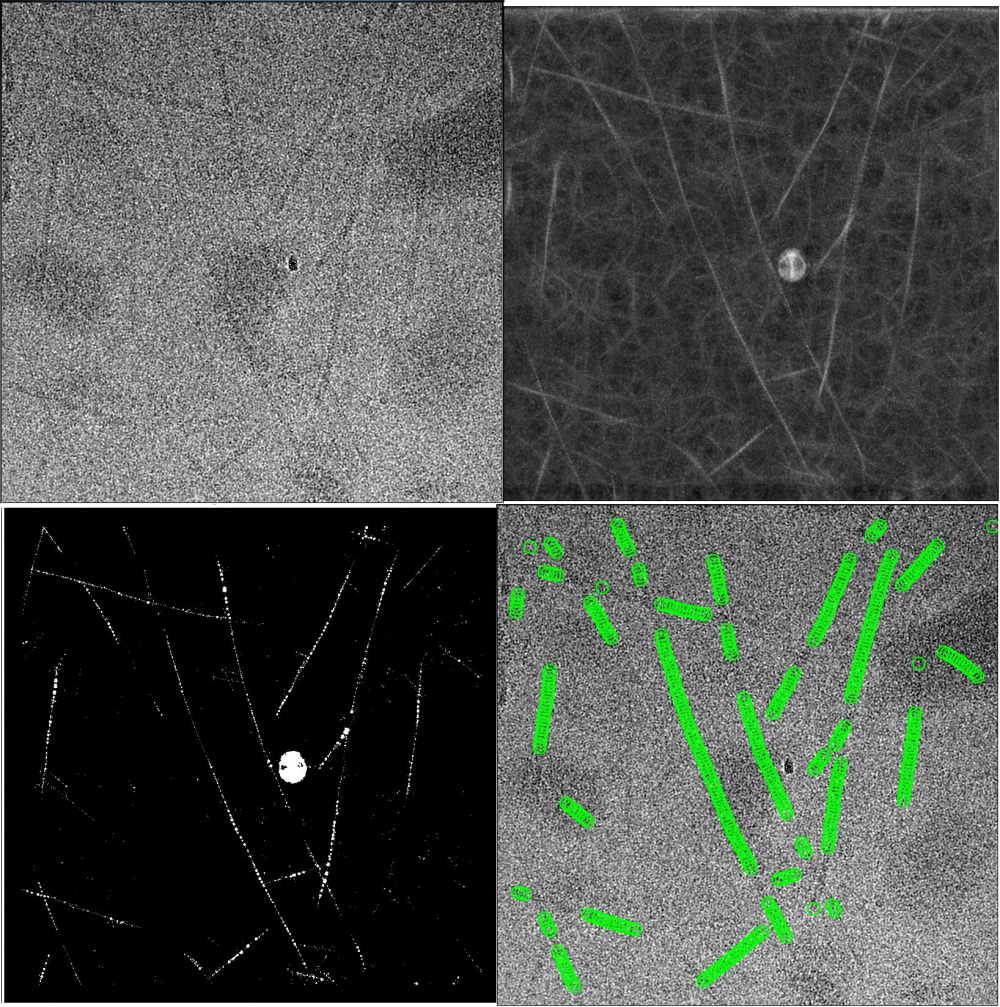
Semi-automated segment picking may achieve at least as good results as manual picking, and is also suitable for short or flexible filaments. The program will perform best if high-quality and diverse 2D templates (e.g. 3~10 2D class averages with different appearances) are used, and the parameters (see below) are carefully tuned.
The 2D templates can have any in-plane orientation, i.e. they do not need to be aligned horizontally. Finer angular samplings (~3°, instead of the default 5° for single-particles) may improve the results of helical segment picking. GPU acceleration is supported for auto-picking helical segments, but unlike for single-particles it is not recommended to shrink the micropraphs or references to a large extent (values greater than 0.5 have been observed to give good results). The Minimum inter-particle distance from the single-particle approach will be ignored. Instead, an inter-box distance of number of asymmetrical units × helical rise will be enforced. The Maximum curvature parameter (κ) deals with flexibility of helices. Κ = 0.3 means that the curvature of the picked filaments should not be larger than 30% the curvature of the circular mask. We recommend a value of ~0.05 for long and straight filaments (e.g. TMV and VipA/VipB filaments) and 0.2~0.4 for more flexible ones (e.g. MAVS-CARD filaments). You may also want to set the minimum length to exclude short filaments from the results.
We tune the picking threshold for a new data set as follows. Firstly we manually pick 5~10 representative micrographs. Micrographs in this set are different in terms of defoci, thickness of ice layers, contamination features and density of filaments. Then we write out FOM maps with the default picking threshold. Strings of bright dots, where the templates correlate strongly with the filaments, can be observed on *_combinedCCF.spi maps. The FOM values of bright dots imply possible ranges for picking thresholds. *_combinedPLOT.spi maps serve a as guidance for tuning thresholds. The maps show filtered dots with FOM values above the threshold and helical tracks found by the auto-picking algorithm. An optimal picking threshold generates tiny bright dots all the way along each of the filaments, and the fitted tracks should be long and continuous along the filaments and do not interfere with each other. If *_combinedPLOT.spi maps are written out but empty, the reasons could be that the threshold is so high that excludes all FOM values, or so low that the program stops finding helical tracks among an ocean of dots. The maximum standard deviation of noise can be set to -1 (deactivated) since track finding is less affected by big contamination features compared to auto-picking of single particles.
Auto-picking needs to be followed by 2D classification where bad classes and segments are discarded before the reconstruction.
Import coordinates
It is possible to import coordinates from other programs for picking helical segments. RELION supports helical tube/segment coordinates from EMAN2 (*.box) and XIMDISP (*.coords).
It is preferable to provide start-end coordinates of segments, because this give freedom to set the inter-box distance in the particle extraction step. If you do provide coordinates for individual segments, make sure the inter-box distance is a multiple of the helical rise.
Tube star-end coordinate files in EMAN2 (*.box) format should contain exactly the following content (ignore comments after // symbol):
1463    3307    260     260     -1        // Tube 1 starting coordinates: x, y, box width, box width, -1
851     2211    260     260     -2        // Tube 1 end coordinates: x, y, box width, box width, -2
407     2039    260     260     -1        // Tube 2
-45     1482    260     260     -2
...
EMAN2 box widths are ignored and overwritten by the box size specified in particle extraction step.
Tube coordinate files in XIMDISP (*.coords) format should contain exactly the following content (ignore comments after // symbol):
Box     1
         750         670    // Top-left coordinates of rubberband box 1
        1245         375    // Top-right coordinates of rubberband box 1
        2980        3275    // Bottom-left coordinates of rubberband box 1
        2485        3570    // Bottom-right coordinates of rubberband box 1
         750         670    // Top-left coordinates of rubberband box 1
Box     2
        2500        3575
        1925        3560
        1990         515
        2565         530
        2500        3575
...
Segment coordinate files in XIMDISP (*.coords) format should contain exactly the following content (ignore comments after // symbol):
  x       y      psi      // One-line header
1043    3380    7.125     // Segment 1: x, y coordinates, in-plane rotation angle (in degrees)
1019    3383    7.125     // Segment 2
995     3386    7.125
970     3389    7.125
946     3392    7.125
...
The ways to import movies/micrographs and coordinate files are explained in the RELION 2.0 tutorial. Please note that no errors are raised if you have accidentally made mistakes in handling imports until particle extraction. Please make sure that the file contents and the filenames with wildcards (*, ?) are provided correctly. In addition, RELION requires that the movie/micrograph file exists if the coordinate file with the same rootname is imported.
Particle extraction
Extraction of helical segments not only writes out particle stacks but also appends information that is needed for some of the alignment priors later on (with labels _rlnHelicalTubeID, _rlnAngleTiltPrior, _rlnAnglePsiPrior, _rlnHelicalTrackLength and _rlnAnglePsiFlipRatio) to each segment. The resulting Particle (*.star) files are in the following format:
data_

loop_
_rlnCoordinateX #1
_rlnCoordinateY #2
_rlnHelicalTubeID #3
_rlnAngleTiltPrior #4
_rlnAnglePsiPrior #5
_rlnHelicalTrackLength #6
_rlnAnglePsiFlipRatio #7
 1822.915020   227.604136            1    90.000000   -58.642915    43.599998     0.500000     // Segment 1
 1845.603159   264.835953            1    90.000000   -58.642915    87.199997     0.500000     // Segment 2
 1868.291298   302.067770            1    90.000000   -58.642915   130.799995     0.500000
 1890.979436   339.299588            1    90.000000   -58.642915   174.399994     0.500000
 1913.667575   376.531405            1    90.000000   -58.642915   217.999992     0.500000
...
Choices of box sizes for different purposes have been discussed above.
Bimodal angular priors (0.5 psi flip ratios) are always needed unless the helices have Dn symmetry, in which case the segments lack polarities.
Coordinates are start-end only for tube coordinates so set it to No for segment coordinates (auto-picked segments, etc). With tube coordinates, helical filaments are cut into overlapping segments with an inter-box distance of the number of asymmetrical units × the helical rise. For segment coordinates, the distance is predetermined and therefore cannot be changed here. No matter which coordinates are used, the distance must be multiple of the helical rise if the segments are extracted for 3D reconstruction.
Small inter-box distances will result in many segments being extracted, which make computations expensive. Tiny intervals (≤5 pixels) should be avoided since segment coordinates are rounded to integer values in the extractions and the relative inaccuracies of positions could be larger. On the other hand, the maximum inter-box distance depends on the Z length parameter in 3D reconstruction. If Z length is set to 30% (as default), the inter-box distance should not exceed (100% - 30%) ÷ 2 = 35%. As a convention, please use ~10% the box size as the inter-box distance. Based on our experience, an inter-box distance as large as 30% of the box size still gives good reconstructions when the helices are rigid and with fixed symmetry.
If the helical parameters are still completely unknown, you may want to start with an inter-box distance of 5~10% of the box size, run 2D classification, and for example try to use the resulting 2D classes for Fourier-Bell indexing.
2D classification
Input images STAR file should come from particle extraction with helical settings.
Larger number of classes might be needed for huge data sets. But you may also want to divide the original STAR file into smaller ones (using the command relion_helix_toolbox --divide), perform 2D classification for each subset (100,000~200,000 segments with ~100 classes) and then combine the selected segments (relion_helix_toolbox --combine or "Join STAR files" job-type in the GUI) to speed up calculations.
The default value of in-plane angular sampling for single-particle analysis (5°) appears to be suboptimal for most helices, and a value of ≤1° is recommended. Coarser angular samplings often lead to blurring of the 2D class averages around the edges of their circular masks. The stdout output indicates what would be the upper-limit on the value to use ( arctan(2 × Resolution_Å ÷ mask_diameter_Å):
CurrentResolution= 5.29412 Angstroms, which requires orientationSampling of at least 1.49378 degrees for a particle of diameter 405 Angstroms
Wider tubes, bigger boxes or less accurately picked segments may require larger offset search ranges than the defaults on the GUI.
The value for option do bimodal angular searches must agree with what you have used in the previous particle extraction. In most cases it should be set to Yes unless the structure has Dn symmetry so that all the helical segments lack polarities.
Local angular searches will be performed within ± the angular search ranges (in degrees) around the in-plane rotation (psi) that was calculated in the 'Particle extraction' step. The default value, 6°, means the local searches will be conducted within a Gaussian prior which has a sigma of 2°. Note that the range here should be greater than the angular sampling.
As an additional argument, --dont_check_norm prevents possible errors caused by normalisation of some helical segments, especially if the micrographs are seriously contaminated or the shapes of masks here are different from those in particle extraction. You might also need this option for the following 3D reconstructions.
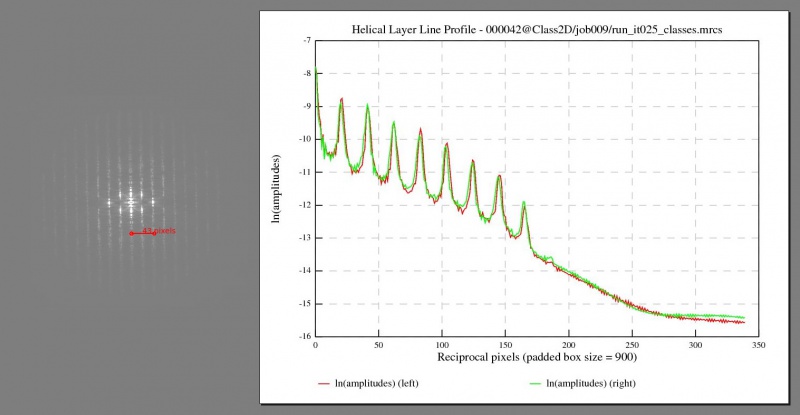
After the 2D classification, the best classes should have their averaged segments lying horizontally when they are visualised with relion_display. You may also want to check their collapsed layer line profiles, Fourier amplitudes or phase angles in the diffraction patterns. Set sigma contrast if you want to find layer lines clearly on Fourier amplitude maps. Note that the layer line profiles and Fourier maps are generated from 2× floated and padded real-space data. For example, suppose that the box and the pixel size of a 2D classification job are 350 pixels and 1.34Å respectively. If the first layer line (l=1) is 15 pixels (measured using relion_display) off the equator, it implies that the helical repeat might be around 2 × 1.34 × 350 ÷ 15 = 62.53Å.
We have observed rare cases where over-fitting occurs due to high level of noise or very small inter-box distances (<5%) in segment picking. Possible signs of over-fitting include large number of empty 2D classes, extremely high claimed resolution (above 4Å or near 2× Nyquist) together with class averages which lack clear structural details. We have found that restricting the resolution in the E-step (e.g. use additional argument --strict_highres_exp 5) may alleviate the problem.
Initial 3D model generation
Initial models play an critical role in 3D helical reconstructions. RELION does not provide a one-size-fits-all solution for de novo initial model generation. Incorrect initial models may lie outside the radius of convergence of the 3D refinement algorithm, and thus lead to completely incorrect structures. In particular, there are many false minima in the energy landscape of the helical twist and rise. Therefore, you should always be cautious if your helical reconstruction does not extend beyond 4~5Å resolution, and you do not see clear side-chain densities. In addition, since RELION acts as a local optimiser, it cannot be guaranteed that a reconstruction will always converge to the best local (or global) optimum even if the structure looks reasonable and shows clear side-chain densities after refinement, especially when the initial reference is drastically different from the real structure (e.g. featureless cylinder or simulated helical lattice) and additional iterations are required for better results. In these cases, we suggest another round of 3D refinement using the previous-round refined structure as the new initial reference to check whether the result can be further improved. In one of our test cases, we have found that one refinement starting from a cylinder gives 8Å resolution and a following reconstruction improves the resolution to 6Å, revealing more details of the structure.
In this section, we describe various options to obtain initial models for helical reconstruction. However, there is no guarantee that one of these will work for your data set! In general, we encourage you to also try traditional Fourier-Bessel methods (for lattice finding or indexing) on your best filaments or 2D class averages, in order to figure out possible helical parameters if the symmetry is still unknown.
There are some general requirements related to 3D references. Firstly, a spherical mask with diameter of ≤90% of the box size should be applied to the 3D reference before it is imported using RELION GUI. As mentioned above also, this mask reduces Fourier artefacts in image transformations. You can use the option --spherical_mask in the relion_helix_toolbox utility (also see below) to generate and apply this mask. Secondly, for helical processing we often observe that we need less stringent lowpass filters than for single-particles, e.g. 20~30Å, as more stringent filters often remove the information about the helical lattice. Obviously, the model should have the same box and pixel size as the extracted segments.
Featureless cylinders
Featureless cylinders are unbiased initial models that sometimes work for simple helices, with e.g. at most 10~20 subunits in each segment box and few contacts between neighbouring subunits. For such structure, one may even refine the data in C1 point group symmetry, without applying helical symmetry. The resulting model may then reveal the helical symmetry, which could then be imposed in a second refinement. The command below writes out a soft-edged cylinder with a spherical mask already applied (options inside the parentheses can be omitted):
relion_helix_toolbox --cylinder --o ref.mrc --boxdim 300 (--cyl_inner_diameter -1) --cyl_outer_diameter 200
                     --angpix 1.34 (--sphere_percentage 0.9 --width 5)
This type of references are not on the correct grey scale (and could be considered CTF corrected, although this is probably not very important).
Simulated helical lattices
Simulated helical lattices can be used if the helical symmetry is known or limited to several choices. The following commands write out the simulated references with soft-edged spheres according to the specified helical parameters. These were used for our near-atomic reconstructions of VipA/VipB (EMPIAR-10019, EMDB-2699, PDB-3J9G) and MAVS-CARD filaments (EMPIAR-10031, EMDB-6428) respectively:
relion_helix_toolbox --simulate_helix --o VipASimRefCyl160Sub80.mrc --subunit_diameter 80 --cyl_outer_diameter 160
                     --angpix 1 --rise 21.8 --twist 29.41 --boxdim 450 --sym_Cn 6 (--sphere_percentage 0.9 --width 5)
relion_helix_toolbox --simulate_helix --o MAVSSimRefCyl50Sub50.mrc --subunit_diameter 50 --cyl_outer_diameter 50
                     --angpix 1.05 --rise 5.07 --twist -101 --boxdim 300 (--sym_Cn 1 --sphere_percentage 0.9 --width 5)
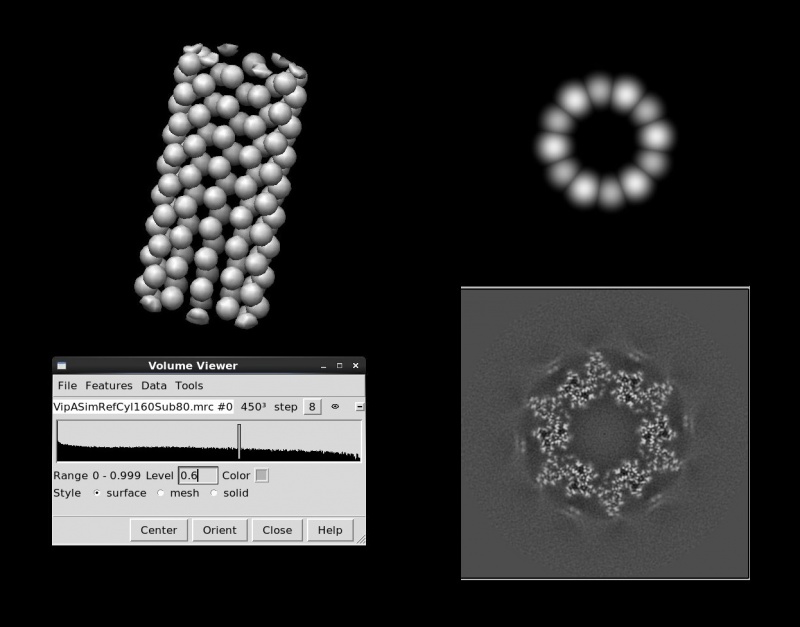
relion_display.Obviously, these models are better suited for subunits with pesudo-spherical shapes. For tube-shaped subunits such as TMV particles, refinements from initial models made of soft spheres have been observed to diverge away from the correct helical symmetry in the early iterations. For optimal results, the diameters of spheres should be large enough to simulate contacts between neighbouring subunits, and the positions of spheres should be more-or-less consistent with the subunit positions on the true helical lattice. The observed filament widths might give a hint of what values of diameters you should consider. These models with spheres conform to Dn symmetry. Options --polar --topbottom_ratio XXX --cyl_inner_diameter XXX replace spheres with small distorted cylinders if polarities are needed in the initial references.
Again, these references may be considered CTF corrected, but they are not on the correct absolute grey scale.
PDB helices
You may use maps of the helix from PDB subunits if the structures of subunits or their homologs are already solved and deposited in the PDB. And it is also required that you know or have only a few choices of helical parameters for the structure. For example, with relion_helix_toolbox, a TMV helix with 200 subunits can be simulated with PDB entry 4UDV using the following command:
relion_helix_toolbox --pdb_helix --i 4UDV.pdb --o 4UDV_helix.pdb --cyl_outer_diameter 0 --rise 1.408 --twist 22.03 --nr_subunits 200
It requires that the PDB subunit be in the proper orientation for forming a helix. And the parameters --cyl_outer_diameter and --center_pdb should be carefully considered depending on where the subunit is positioned in the original PDB coordinate system. In this case, the atoms in PDB entry 4UDV have already been fitted into the reconstructed map of TMV (EMDB-2842) so here --cyl_outer_diameter is set to 0 and the option --center_pdb is not activated.
Afterwards, the PDB helix needs to be converted into .mrc format (e.g. with e2pdb2mrc.py) with the same box and pixel sizes used in particle extraction. Note that a spherical mask of ~90% the box size should also be applied afterwards:
e2pdb2mrc.py 4UDV_helix.pdb 4UDV_helix.mrc --apix 1.062 --box 300 --res 4
relion_helix_toolbox --spherical_mask --i 4UDV_helix.mrc --o 4UDV_helix_masked.mrc (--sphere_percentage 0.9 --width 5)
These references are CTF corrected but usually not on the absolute grey scale.
Fourier-Bessel reconstruction
Initial models can also be generated from Fourier-Bessel method. There is a learning curve to this, but you can draw lattices according to the diffraction patterns and construct simulated references with a limited number of possible choices of helical symmetry. If a reference comes from Fourier-Bessel reconstruction (e.g. with HLXFOUR, a helical program in Image2000 package), the reference is not CTF corrected and usually not on the absolute grey scale.
Models from tomography
Models from tomography can visualise 3D helices and even reveal their helical symmetries without any requirement of prior knowledge. Refer to sub-tomogram averaging section in RELION wiki. Once you have a clue about the symmetry, you can choose from the methods in this section to build the reference for 3D reconstruction.
3D classification and refinement
The "Helix" tabs are the same for 3D classification and 3D auto-refine job types. Minor differences between these two job types are mentioned at the end of this part.
Angular samplings should be finer than the values used in ordinary single particle analysis since a small change of orientation (for example, in rot angle), may lead to a totally different projection of the helix. We always use ≤3.7° as initial samplings and even ≤1.9° for complex helical lattices with more subunits. And the samplings to kick off local searches should be strictly smaller than the initial ones. Helical reconstruction does not search for all the orientations in 3D space as described later in this section so finer angular sampling rarely leads to memory problem for medium sized particle boxes (≤500 pixels). The choice of initial offset range depends on the accuracies of segment picking. We increase the offset search ranges (to 10 pixels) for manually picked data sets because filaments are not perfect and might deviate from manually picked straight lines, in which case the offsets of the extracted segments accumulate in the directions perpendicular to the helical axes.
Copy the number of asymmetrical units, helical twist and rise from previous job settings if available, and you should also ensure that the symmetry parameters of the initial reference agree with what are provided here.
Local searches of helical symmetry should be turned on if the twist and rise are only roughly estimated (e.g. with Fourier-Bessel). Or the symmetry is undetermined and you attempt to find a reasonable one within a small range. We always use these options since the initial symmetry may change slightly depending on the given data set or the internal interpolation scheme adopted by the program, even for a rigid structure with well-known symmetry such as TMV. It can also be considered as a measure to calibrate the pixel size. The search ranges can be set to ±10% around the initial values and wider ranges may diverge the reconstruction or not be necessary at all since the results might stick to the symmetry of the initial reference. Generally, it is not necessary for the user to provide initial steps of twist and rise searches. By default, the initial steps are ≤1° for twist and ≤1% the initial rise respectively. No matter what values are provided by the user, the program will always start with 5~1000 samplings for both parameters. However, it can not be promised that you can always discover the correct symmetry (even if it lies within the given search ranges), especially when you start with a symmetry far away from the optimal values, because there seem to be too many local minima in the space of helical parameters. For the reason above, we suggest that you always make efforts in retrieving all types of prior information about the structure (e.g. from literature, 2D classes, Fourier-Bessel, tomography and even information about its homologs) before refinement. And only when a near-atomic resolution map comes out with clear details can you conclude that the correct symmetry has been found. The optimised helical rise and twist can be found in the Refine3D/jobXXX/run_model.star file:
...
data_model_classes

loop_
_rlnReferenceImage #1
_rlnClassDistribution #2
_rlnAccuracyRotations #3
_rlnAccuracyTranslations #4
_rlnHelicalRise #5
_rlnHelicalTwist #6
Refine3D/jobXXX/run_class001.mrc     1.000000     0.186000     0.250000    21.775977    29.410791
...
Helical reconstruction is based on the assumption that micrographs contain side views (tilt~90°) of helices, and the in-plane angular priors (with unknown polarity) can be estimated through the directions of filaments. Therefore there is no need to consider all the orientations in global searches. By default, angular searches will be performed within ±15° around the initial tilt (90°) and ±15° around the in-plane (psi) angular prior of each segments. The default values work well for most cases but other choices might improve performance. Long, straight and wide filaments do not deviate much from the untilted (90°) side views on relatively thin ice layers thus a smaller search range for tilt saves time and does not affect the final results. On the contrary, short and flexible helical filaments may require larger ranges. A search range of ±15° around bimodal psi priors might be too conservative for carefully manual-picked filaments, and 3~5° can be more efficient especially when you suffer from memory problem caused by large box sizes. In addition, smaller search ranges of tilt (≤5°) might possibly improve convergence behaviour for reconstructions starting with featureless cylinders.
Single particle analysis assumes that all the experimental projections are independent, thus it might lead to a mixture of polarities for segments coming from the same filament, which could be the main source of bad alignments during refinement. Segments from each filament are assigned the same polarity if the range factor of local averaging is set to positive (a value of 2 is recommended). To correct polarities of the outliers, the program flips their psi angles by 180° and modify their tilts across 90° respectively. Enabling this option benefits the refinements of simple and flexible helices. Based on our tests, about 10% segments with wrong polarities are corrected and the final resolution is slightly improved sometimes. However, we find that the option is not necessary for well-ordered filaments from complicated helical lattices since most of the segments are already aligned properly. In the meantime, the factor has the effect of locally averaging the estimated orientations and translational offsets for all segments in every iteration since some segments are poorly aligned due to contamination features. If the factor is set to 2, the translation perpendicular to the helical axes and tilt and psi angles of each segment will be weight-averaged with its neighbours within the the distances of 2× the box size.
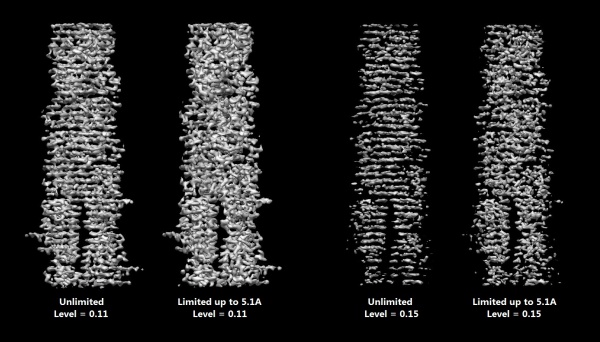
We note here that in very rare cases we have observed over-fitting artefacts due to a few extremely strong structure factors. The Fourier amplitudes are restricted to layer lines since the 3D helical structures span along Z axis, which will inevitably give rise to bumps at specific resolutions in FSC curves calculated between pairs of half maps. Especially when the noise levels are high in the extracted segments, signal to rise ratios at some of the (spherical!) Fourier shells could get overestimated, which results in strong, repetitive artefacts along the Z axis. For example, the column _rlnSsnrMap in run_model.star file from a reconstruction of ParM shows over-fitting at around 4.92Å (approximately the inter-strand distance in beta-sheets), and layers of artefacts are about 5 pixels (pixel size = 1.07Å) apart along Z axis in the post-processed real space map. We have found that restricting the resolution in the E-step (e.g. use additional argument --strict_highres_exp 5.1 in 3D auto-refine, or use the corresponding GUI option for 3D classification) may reduce these artefacts.
data_model_class_1

loop_
_rlnSpectralIndex #1
_rlnResolution #2
_rlnAngstromResolution #3
_rlnSsnrMap #4
_rlnGoldStandardFsc #5
_rlnReferenceSigma2 #6
_rlnReferenceTau2 #7
_rlnSpectralOrientabilityContribution #8
...
         71     0.189586     5.274649     3.873985     0.461725 3.795443e-10 3.803550e-10     0.001182
         72     0.192256     5.201390     2.684755     0.361354 3.788313e-10 2.406769e-10     0.001445
         73     0.194927     5.130138     2.056476     0.292570 3.633151e-10 1.833294e-10 6.531686e-04
         74     0.197597     5.060812     2.115132     0.299564 3.622789e-10 2.036862e-10     0.001276
         75     0.200267     4.993334     3.447641     0.429466 3.511161e-10 5.011133e-10     0.003923
         76     0.202937     4.927632    12.082390     0.743627 3.438695e-10 1.180306e-09     0.011765     // Here's the bump in the SNR
         77     0.205607     4.863637     5.011538     0.532541 3.396874e-10 3.910653e-10     0.004364
         78     0.208278     4.801283     2.483549     0.340733 3.289081e-10 1.661369e-10     0.001407
         79     0.210948     4.740507     1.778737     0.257671 3.226575e-10 1.151241e-10 7.080613e-04
         80     0.213618     4.681251     1.580456     0.230861 3.192557e-10 9.093500e-11 2.854827e-04
...
3D classification has the potential to separate various conformations or even slightly different helical parameters. The classification can be performed before or after any high resolution 3D refinement, with or without image alignment. If the image alignment (on "Sampling" tab) is not to be performed, tilt and psi search ranges on "Helix" tab take no effect. And if image alignment is performed with local angular searches, the local ranges overwrite the tilt and psi search ranges.
Mask creation & post-processing
Post-processing estimates an overall resolution by correcting for the convolution effects of a solvent mask. This mask can be generated using the 'Mask creation' job-type on the GUI. Because thetop and bottom parts of the reconstructed helical map are often blurry due to Fourier-space artefacts, inaccuracies in the orientations and flexibility in the helical segments, one typically only wants to estimate resolution based on the central of the reconstruction. Therefore, on the 'Helix' tab we usually test different values for the central Z length and assess the resulting postprocessed map for its features.
Movie-refinement & particle polishing
Movie-refinement and particle polishing are very similar to standard single-particle procedures. On the Helix tab of the Particle Polishing job-type, just provide the number of asymmetrical units and the correct helical symmetry parameters.
relion_helix_toolbox
relion_helix_toolbox is a standalone executable in RELION 2.0 and features many useful tools which we often use when processing helical data. The command relion_helix_toolbox (without any options, in RELION v2.0 and below) or relion_helix_toolbox --function_help (in v2.1 and above) displays the full list of functions and parameters available in the error message. Type the command relion_helix_toolbox [function] --help (in RELION v2.0 and below) or relion_helix_toolbox [function] --function_help (in v2.1 and above) for the usage of a function. The commands for initial model generation have been explained above and here we present more examples of the available functions. Note that the parameters shown inside parentheses don't need to be provided if their values remain as default.
Check parameters before running 3D classification/refinement
We notice that users might provide invalid parameters for 3D helical reconstruction jobs and sometimes they don't realise until loads of time has already been wasted on waiting for the job to get onto the CPU cluster. To reduce the disappointment, we implemented the --check option in the toolbox. Please copy all the parameters for a 3D reconstruction job on 'Helix' tab to the command line and tune the parameters according to the instructions if error messages appear.
relion_helix_toolbox --check --boxdim 300 --angpix 1.126 --sphere_percentage 0.9 (--cyl_inner_diameter 20)
                     --cyl_outer_diameter 240 (--ignore_helical_symmetry --search_sym --z_percentage 0.3 --nr_asu 20
                     --rise 1.408 --rise_min 1.3 --rise_max 1.5 --twist 22.03 --twist_min 21 --twist_max 23)
Impose helical symmetry in real space
The following command imposes helical symmetry of TMV filaments on a 3D box based on the pixel values within a central Z length of 30% the box size. (The diameters and the helical rise are in Angstroms while the width of soft-edged mask is in pixels.)
relion_helix_toolbox --impose --i in.mrc --o out.mrc (--cyl_inner_diameter -1) --cyl_outer_diameter 200
                     --angpix 1.126 --rise 1.408 --twist 22.03 (--z_percentage 0.3 --sphere_percentage 0.9 --width 5)
Local searches of helical symmetry in real space
The following command searches for the best helical symmetry within the specified range based on the pixel values within a central Z length of 30% the box size.
relion_helix_toolbox --search --i in.mrc (--cyl_inner_diameter -1) --cyl_outer_diameter 200 --angpix 1.126
                     --rise_min 1.3 --rise_max 1.5 (--rise_inistep -1) --twist_min 20 --twist_max 24 (--twist_inistep -1) (--z_percentage 0.3)
Divide/join STAR files
Some helical data sets contain huge number (>1,000,000) of segments. It may be more efficient to perform 2D classification in small batches or test 3D reconstruction with a subset. The function below divides one large STAR file into arbitrary number of small files almost evenly in terms of line entries.
relion_helix_toolbox --divide --i run_data.star --nr_outfiles 10
This command writes out 10 files named run_data_sub000001.star, run_data_sub000002.star, ... , run_data_sub000010.star. And they can be imported in the GUI for separate processing. Afterwards, one need to rename the processed STAR files (e.g. 10 files with selected segments after 10 independent 2D classification jobs) with a same rootname for combination. For example, the following command joins all the STAR files with names starting with selected in the current directory and writes out selected_combined.star.
relion_helix_toolbox --merge --i_root selected
Rhe list of files being merged is displayed on the screen. The combined file needs to be imported in the GUI for further processing as well.
Remove segments with poor angular orientations
After 3D reconstruction, some segments might deviate too much from their estimated tilt and in-plane rotation priors due to poor alignment. Possible explanations could be low signal-to-noise ratio, improper normalisation or huge contamination features in the segments boxes. One may try discarding the poorly aligned segments for the next reconstruction job. The following command keeps segments with tilt angles in the range of 70~110° (90°±20°) and discards the others.
relion_helix_toolbox --remove_bad_tilt --i run_data.star --o run_data_new.star --tilt_max_dev 20
Segments with in-plane rotations (psi) far away from their priors can be filtered if the range factor for local averaging is activated in the 3D reconstruction. The following command throws away segments with in-plane rotations (psi) which deviate >15° from their priors.
relion_helix_toolbox --remove_bad_psi --i run_data.star --o run_data_new.star --psi_max_dev 15
Sub-tomogram averaging of helices (not available yet)
(not available yet)
References
We gained experience with helical processing in RELION using the following entries from the EMPIAR database (10019, 10020, 10021, 10022, 10031). The related research papers are listed below:
[1] He, S & Scheres SH. "Helical reconstruction in RELION." J Struct Biol. (2017) [Epub ahead of print] PubMed
[2] Kudryashev, Mikhail, et al. "Structure of the type VI secretion system contractile sheath." Cell 160.5 (2015): 952-962. PubMed
[3] Fromm, Simon A., et al. "Seeing tobacco mosaic virus through direct electron detectors." Journal of structural biology 189.2 (2015): 87-97. PubMed
[4] Xu, Hui, et al. "Correction: Structural basis for the prion-like MAVS filaments in antiviral innate immunity." Elife 4 (2015): e07546. PubMed
[5] Bharat, Tanmay AM, et al. "Structures of actin-like ParM filaments show architecture of plasmid-segregating spindles." Nature (2015): 1-5. Nature
[6] Pettersen, Eric F., et al. "UCSF Chimera—a visualization system for exploratory research and analysis." Journal of computational chemistry 25.13 (2004): 1605-1612. PubMed
