|
ProSHADE
0.6.5 (NOV 2018)
Protein Shape Descriptors and Symmetry Detection
|
|
ProSHADE
0.6.5 (NOV 2018)
Protein Shape Descriptors and Symmetry Detection
|
ProSHADE is a C++ language library and an associated tool providing functionalities for working with structural biology molecular structures. The library implements functions for computing shape-wise structural distances between pairs of molecules, detecting symmetry over the centre of mass of a single structure, map re-sizing as well as matching density maps and PDB coordinate files into one another. The executable implemented in the bin.cpp file then allows easy access to these functionalities without the need for library linking, while the python modules provide easy access to the functionality from the python language. For help on how the executable should be used, refer to the -h option of it. For more details about the functionalities, see below.
1) Installation
1.1) Modifying the install.sh script
1.1.1) CMake
1.1.2) CMAKE_LISTS
1.1.3) GFortran Library
1.1.4) C++ Standard Libraries
1.1.5) Clipper Library
1.1.6) LAPACK(E) Libraries
1.1.7) FFTW3 Library
1.1.8) SOFT Library
1.1.9 RVAPI Library
1.1.10) SWIG Library
1.1.11) Installation paths
1.2) Using the install.sh script
1.3) Installing ProSHADE 'out-of-source'
2) Using the ProSHADE executable
2.1) Symmetry detection
2.3) Re-boxing structure usage
2.4) Overlay mode usage
2.5) Database usage
3.1) Linking against ProSHADE library
3.2) Using the ProSHADE library
4.1) Setting up parameters in run-time
4.2) Computing results
4.3) Accessing the results in runtime
The installation of the ProSHADE software should be done using the CMake system. However, due to the dependence of the ProSHADE software on libraries from other developers, the installation needs to be suppied with paths to specific files, some of which may beed to be installed prior to the installation of the ProSHADE software. The following section provides information about how this can be done manually.
To make the installation as simple as possible, the ProSHADE folder the user obtains from the CCP4's bazaar repository contains a sub-folder called Build. In the Build folder, there is a shell script called install.sh, which needs to be edited by the user in order to supply the required paths to the installation procedure. The install.sh script should appear as follows:
Where the user is required to change to following lines with the appropriate paths on machine on which the installation is taking place.
On line 8, the path to the CMake executable is required. The CMake version need to be higher than 2.6 in order to allow the installation at all. However, the installation of the python modules does require CMake version of at least 3.1. Please make sure the required version is installed and provide path to its executable. A simplest way of obtaining this path is to type 'which cmake' into the shell.
On line 10, the path to the CMakeLists.txt file is required in order to allow automatic detection and installation of some of the dependencies. This path can be obtained by navigating to the Build folder in the shell and then typing 'pwd'.
On line 17, the path to the libgfortran library is required. This dependency does not really apply if GCC is being used to compile and link the software, but needs to be supplied on Mac systems as they use clang as the default compiler. If you cannot locate the libgfortran file, then it may be necessary to install GCC on your system in order to obtain the library.
On line 20, the path to the standard C++ library is required. This option is mainly applicable if you are using multiple GCC versions on your computer, as these would have different versions of the standard libraries and the correct version is needed. You may leave this line empty and if the executable complains about incorrect version of GLIBC++, then this is where the correct path needs to be supplied.
On lines 23-25, the paths to three different files are required. All of these files should be available if CCP4's clipper library is installed on the machine, however, they may not be part of CCP4 installation. If you cannot locate these files, then installing clipper will be required; in order to do so, the Dependencies sub-folder available in the ProSHADE folder contains a shell script called installClipper.sh, which shows how installation of clipper can be done. If you do not want to be bothered about the clippper installation, you may simply navigate to the ProSHADE folder and run the following command for automated installation 'sh ./dependencies/installClipper.sh'.
On lines 29-30, the installation requires the paths to LAPACKE (the C++ interface for LAPACK) includes and libraries. While LAPACK is typically installed on most machines, LAPACKE is not. Furthermore, LAPACK is typically installed as a static library without the position independent code and this then causes ProSHADE to require it to be installed anew. Therefore, unless you have installed LAPACK yourself and are sure that position independent installation was done, please view the script available in the Dependencies sub-folder in the ProSHADE folder for how position independent installation can be done from the source codes. If you want only local installation, you may run the script from the ProSHADE folder to achieve just this: 'sh ./dependencies/installLAPACKE.sh'
On lines 33-34, the paths to the FFTW3 include and FFTW3 library need to be supplied. The FFTW3 is typically already installed on the system and therefore it only needs to be located; however, due to licensing issues, ProSHADE is now coming with FFTW3 version 3.3.7 code already present in the dependencies folder. Therefore, if you do not mind couple of dosen MB of space, you may leave these two lines alone. If you do want to save space and use the same FFTW3 version throughout your computer, then you need to locate the fftw3.h and fftw3.a files, supplied their respective paths to these two lines and delete the fftw-3.3.7 sub-folder from the dependencies folder.
On lines 39-40, the paths to the SOFT library dependency are required. Nonetheless, since this library is usually not present on your system, ProSHADE comes with the required codes already present in the dependencies folder. Therefore, unless you have installed SOFT yourself and linked it with the same version of FFTW3 as used in the previous section, then it is suggested not changing these two lines and leaving ProSHADE to deal with the installation on its own. Alternatively, the user may review the SOFT installation script located in the dependencies folder along with the configuration script for manual installation.
The CCP4's RVAPI library is used to produce dynamic HTML reports from ProSHADE runs. This library should be installed if you have a CCP4 installation, however, as this is a new addition to the ProSHADE dependencies list, it is also provided with the ProSHADE code. This causes some duplication of code, but should not cause any issues with any other software as the ProSHADE version of RVAPI is dynamically linked. Therefore, it is suggested for the user to leave the lines 44-45 alone, unless they are confident they can locate RVAPI and provide the correct paths to ProSHADE installation.
While SWIG is not required by the install.sh script, this installation will fail unless SWIG is installed on your system. Therefore, a script for system-wide installation is available in the Dependencies sub-folder of the ProSHADE folder. The user may review the script and proceed with manual installation or run the script from the ProSHADE folder as follows: 'sh ./dependencies/installSWIG.sh'. Please note that this script does require the administrator password in order to complete the system-wide installation.
The path that can be supplied on line 46 states where the binary, library and include files will be installed, while the python module paths on line 51 (python2) and 56 (python3) state where the ProSHADE python modules will be install. If the python paths are commented out, then the installation scripts will attempt to install them to the defaul system python modules path, however, the installation will fail if the user does not have the write permissions to these folders.
Once the user is satisfied that the installation script has been modified for their purposes, the script may be invoked from the Build folder, by navigating there and typing 'sh install.sh'. The script will start by compiling and linking the SOFT and RVAPI dependencies supplied with the ProSHADE code. Then, the CMake fill proceed with all checks and creating of Makefiles appropriate for your system. Consequently, the script will call these Makefiles to compile and link ProSHADE on your system and test the installation by running the tests supplied in the Tests sub-folder of the ProSHADE folder. A successfull run of the tests appears as follows and should take approximately 2 to 5 minutes:
Should the user require an 'out-of-source' installation, i.e. installation being done in any other location than the defaul Build sub-folder of the ProSHADE folder, this can be done as follows. The simplest approach is to copy the install.sh script to any location in which the user requires the installation, supplying all required paths (as discussed in section 1.1.1 to 1.1.9) and running the script as before. The installation files will all be created in the folder from this the script is being run, while the binary, library and includes will be installed as per the line 46. Similarly, the python modules will be installed to the paths specified on lines 51 (python2) and 56 (python3), or to the default python module location if commented out. The tests should all run using the newly installed components just as in the 'in-source' installation discussed above. After a successfull installation, it is possible to delete the isntallation folder and as long as no ProSHADE component was installed in the same path, this will not affect the functionality, but will save some disk space.
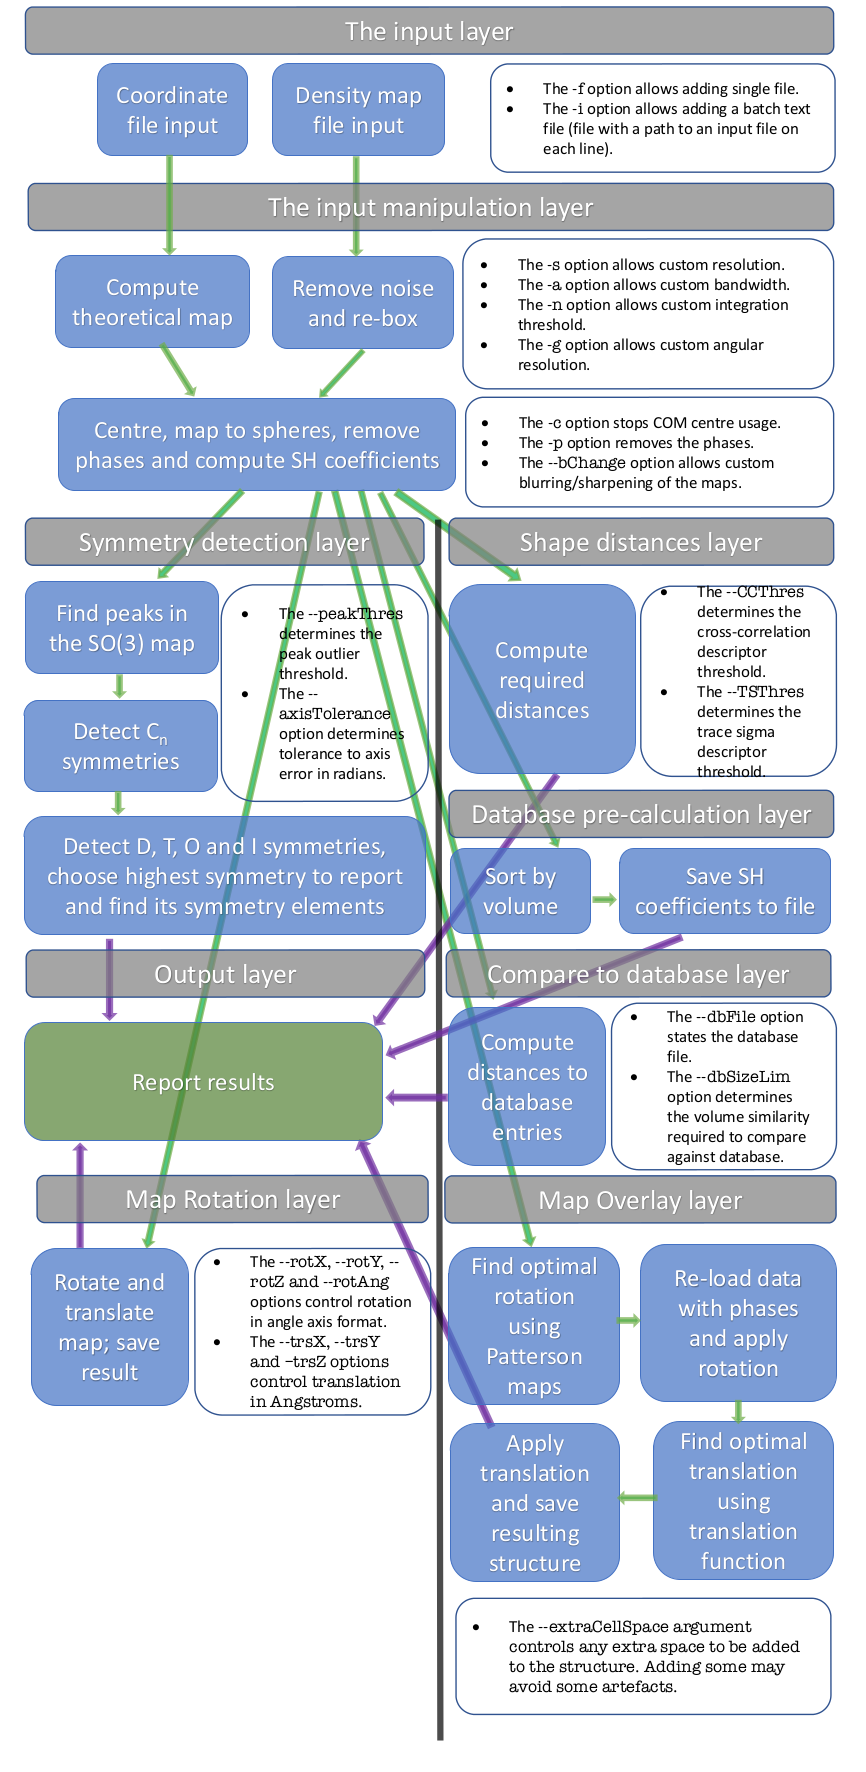
The ProSHADE tool was developed in a modular fashion and as the usage slightly changes depending on the functionality that is required. Nonetheless, care has been taken to make sure that identical or closely related features are controlled by the same command line arguments in all cases. Moreover, the GNU command line options standard have been adhered to (through the getOpts library) and therefore the users familiar with other command line tools should find the entering of command line arguments simple. The following figure shows the general flow of the tool and some of the parameters available to the user to modify the behaviour of the ProSHADE tool.
Generally, ProSHADE tool can be used in several different modes, depending on the intended output. The following sections detail the most frequently used modes.
In order to detect symmetry in either a coordinate input file, or in a map input file, the ProSHADE executable needs to be supplied with the option -S or –symmetry and it will also require a single input file to be supplied using the -f option. These two options are the only mandatory options, although there are many optional values that the user can supply to supersede the default values and therefore modify the operation fo the ProSHADE executable to fir their purpose.
One particular option regarding the symmetry detection mode should be noted; the –sym (or -u) option allows the user to state which symmetry they believe to exist in the structure. The allowed values for this command line argument are "Cx", "Dx", "T", "O" and "I", where the x should be an integer number specifying the fold of the requested symmetry. When this option is used, it removes the default behaviour of returning the highest detected symmetry and instead the symmetry requested by the user is returned, if it can be found in the structure.
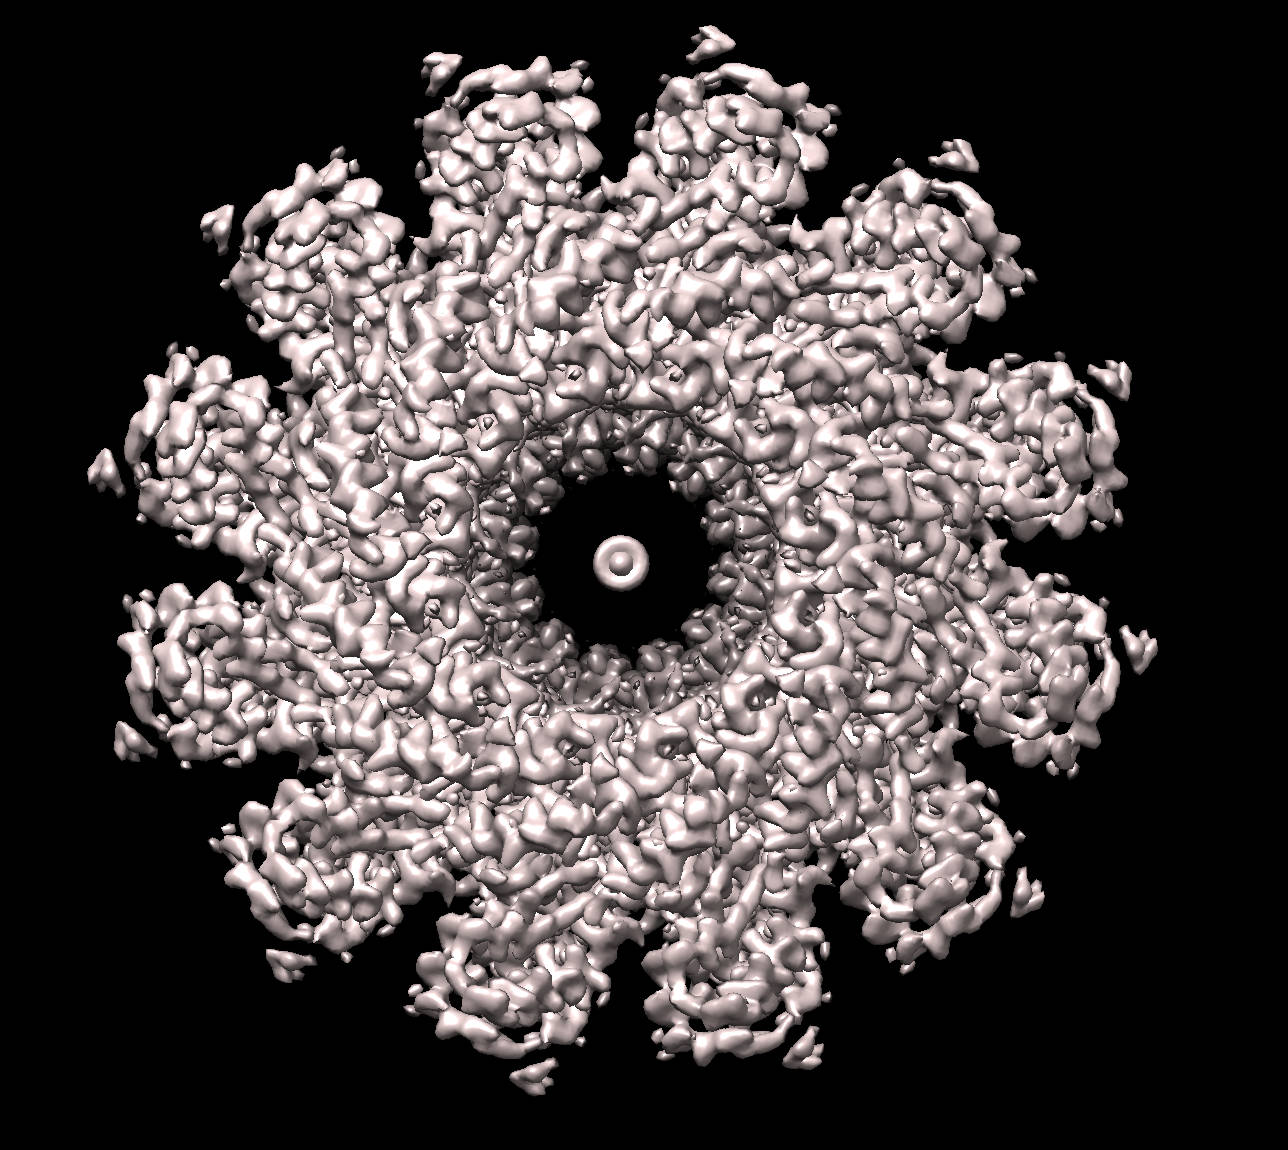
To demonstrate how the tool can be run and the standard output for the symmetry mode of operation, the current version of the ProSHADE executable was used to detect the symmetry of a density map of the bacteriophage T4 portal protein with the PDB accession code 3JA7, which has the C12 symmetry. The visualisation of the structure is shown in the following, while the output of the ProSHADE tool follows:
The distances computation mode is signalled to the ProSHADE executable by the command line argument -D or –distances. This mode requires two or more structures to be supplied either using the -f command line option, or using the batch option -i, which precedes a text file with a single structure path per line for any number of lines. At least two structures are mandatory for the ProSHADE tool to proceed. Please note that the results are calculated only for the first structure against all the remaining structures, not for all against all distance matrix.
There are multiple command line options that the user has available to specify the particulars of how the distances between the structures should be computed; the main command line options include the -s option for entering the required resolution. The -a option allows specifying the maximum spherical harmonics bandwidth, the -n option allows determining the maximum Gauss-Legendre integration limit, while the -g option allows determining maximal angular resolution. The hierarchical distances calculation are controlled by the –CCThres and the –TSThres options for supplying the cross-correlation and trace sigma thresholds. The user should consult the help dialogue available through the -h option for a full list of command line parameters and their description.
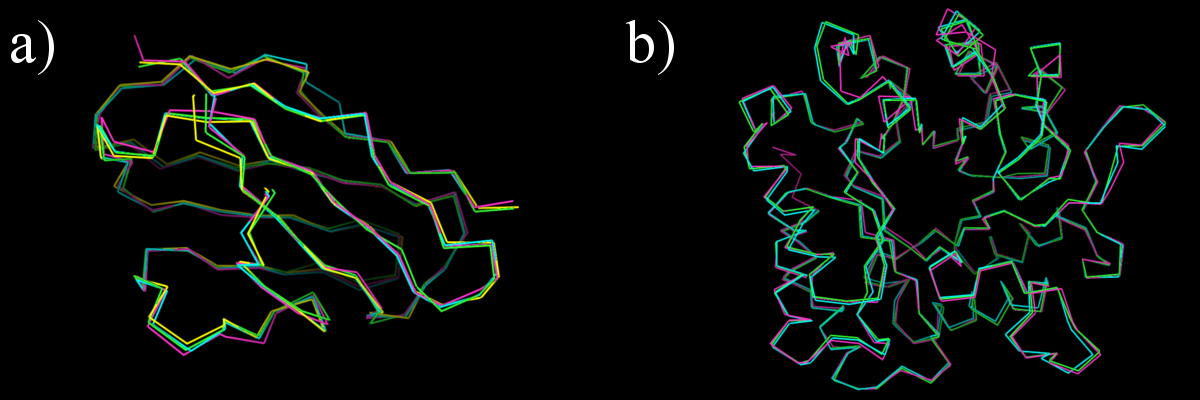
To demonstrate the output of the ProSHADE software tool for computing distances between structure shapes, the distances between the BALBES protein domains 1BFO_A_dom_1 and 1H8N_A_dom_1 (which have similar shape) and the 3IGU_A_dom_1 domain which has a different shape, as can be seen from the following figure - the first two domains are both in cluster a), while the last domain is from the cluster b). The output of the ProSHADE software tool is then shown below:
Another useful feature of the ProSHADE tool is the re-boxing of macromolecular density maps. This mode is signalled to the ProSHADE tool by the command line option -E or –reBox followed by a single map structure file after the -f flag. In this mode, ProSHADE will attempt to find a suitable map mask by blurring the map (increasing the overall B-factors). Consequently, it will use the map boundaries to create a new, hopefully smaller, box to which the appropriate part of the map will be copied.
The location and filename of where this new map should be saved can be specified using the –clearMap command line option followed by the filename. The amount of blurring done in order to obtain the mask is by default started to increasing the B-factor by 250 and this number can be automatically increased if it is required. Nonetheless, if the user requires a different blurring factor, this can be supplied using the –mapMaskBlur command line argument, while the blurred map threshold for masking can be changed using the –mapMaskThres option.
The following snippet shows the output of the ProSHADE tool when used to re-box the Lengsin structure (EMD-1290), where the original volume can be decreased to 78.9% of the original structure volume and thus any linear processing of such structure will be 0.27 times faster and the original. The Lengsin structure box shown in the following figure as semi-transparent grey, while the new box is shown in non-transparent yellow.
In order to find the rotation and translation which optimally overlay (or fit) one structure into another, be them PDB files or maps (and any combination thereof), the ProSHADE tool can be used in the Overlay mode. This is signalled to the ProSHADE tool binary by the command line option -O and this mode requires exactly two structure files to be supplied using the -f command line options. The order of the two files does matter, as the second file will always be moved to match the first structure, which will remain static.
Due to the requirement for the second stucture movement and rotation, it is worth noting that the structure may need to be re-sampled and/or moved to the same viewing position as the first structure. This is done so that only the internal representation is modified, but never the input file. However, when the overlay structure is outputted (as specified by the –clearMap command line option) this header of this output file may differ from the second structure header. Furthermore, if there is no extra space around the structure, movement and rotation may move pieces of the structure through the box boundaries to the other side of the box. To avoid this, please use the –cellBorderSpace option to add some extra space around the structure.
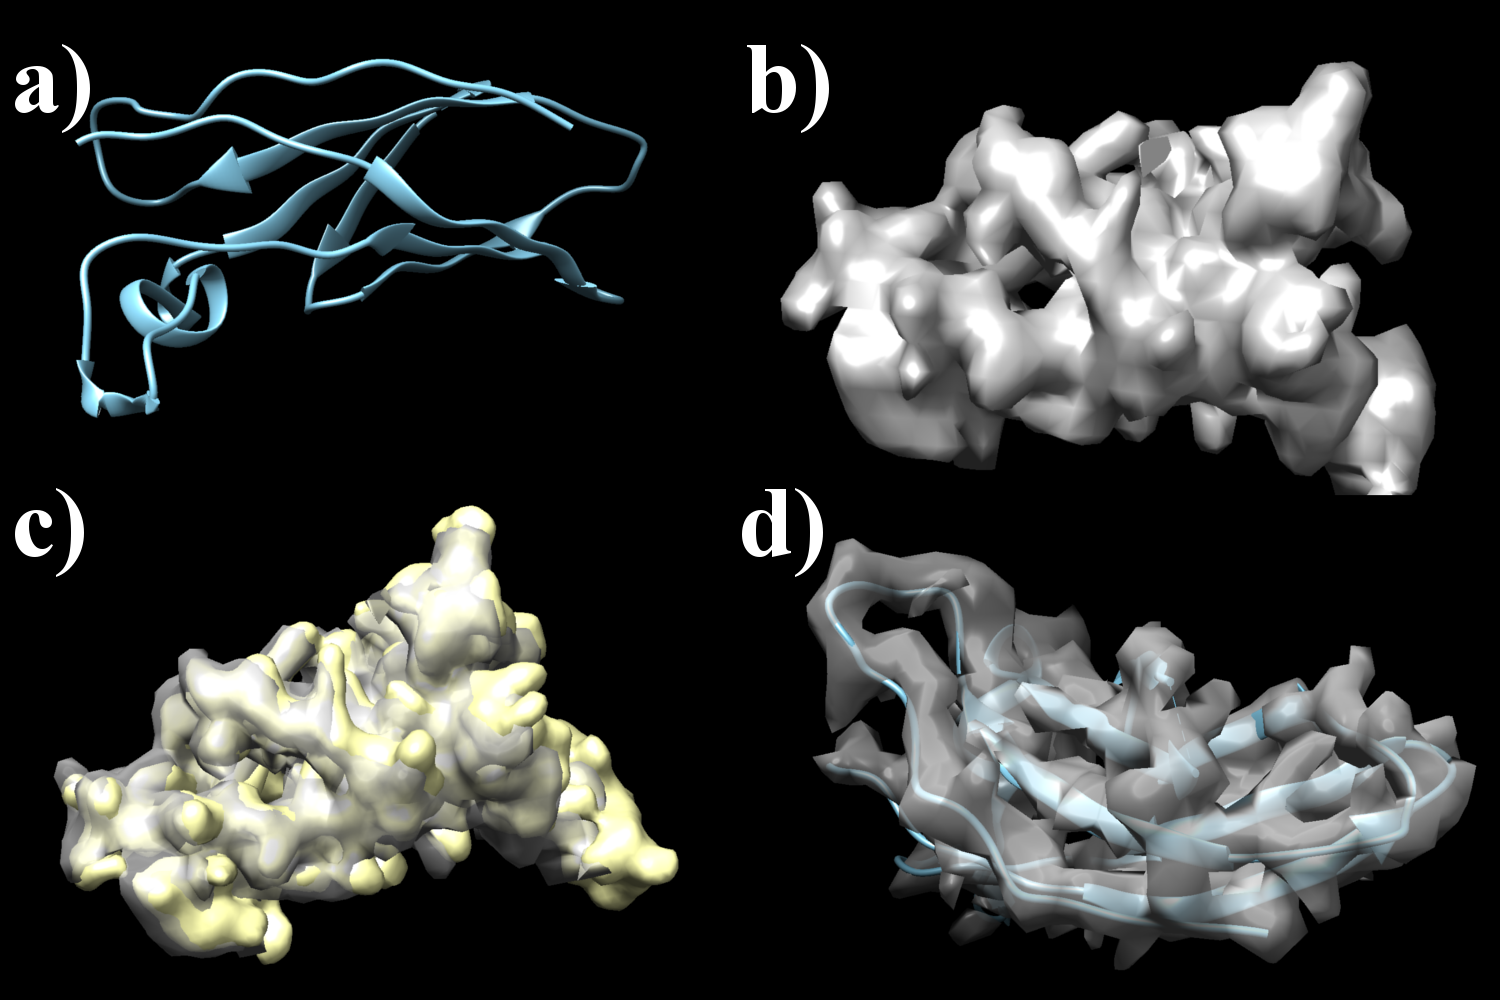
An example of the Overlay mode matching a single PDB structure (2A2Q_T_dom_2 from the BALBES database, original structure code 2A2Q) shown in part a) of the following figure to a density map computed with low resolution from this structure shown in part b) follows. Part c) then shows the match obteined by the internal map representations of both inputs, while part d) shows the final match of the moved PDB file to the original map input. The output and call of the ProSHADE tool is shown below.
In order to build a database using the ProSHADE tool, the command line option -B needs to be supplied as well as a list of structures to be saved into the database (given by either the -f or the -i options as discussed above) and the name for the database file preceded by the –dbFile command line option. These three elements are mandatory for ProSHADE execution in the database building mode, but the same list of command line options as in the section Distances computation can be used to modify how the saved spherical harmonics coefficients are saved.
It should also be noted that once the database is created, all structures which the user wants to search for in the database will be processed using the same settings as the settings used to build the database; the reason is that once the database is computed, its settings cannot be changed unless a new database is computed anew. Furthermore, the database is saved in a sorted order according to the total volume enclosed by the domain and this information is later used when searching against such a database, so that only domains with similar volume would be considered. The –dbSizeLim option can be used to specify the threshold for what "similar volume" means.
To demonstrate the database building and searching, the BALBES protein domain cluster shown in the following figure and consisting of 8 protein domains will be used to produce a database and then a single structure from this cluster will be used as a query to be sought against the database:
and a particular structure can then be queried against the database:
The same functionality as in the executable is now also avaialble as a dynamic C++ library. The library should be located in the ./lib folder of the installation path given to the install.sh script (see section Installation paths ) and the required include file (ProSHADE.h) is avaialble in the ./include directory in the same path. The library can be included into any C++ project by including the ProSHADE.h header file and linking against the library file available in the ./lib folder.
There are several caveats that need to be addressed before the ProSHADE library can be easily linked to any other project. Firstly, the LAPACK dependency requires the libgfortran library to be available during compilaion and linking. To my best knowledge, this means that g++ compiler needs to be installed, as for example clang does not have libgfortran and therefore cannot compile against ProSHADE without refering to the GCC libgfortran. Furthermore, all the dependencies need to be linked into the project as well as the ProSHADE library. This means that something along the following lines need to be added to your linker call.
 g++ $(CXXARGS) -L/path/to/libgfortran  -L/path/to/libclipper  -L/path/to/libfftw3  -L/path/to/softlib  -L/path/to/librvapi  -L/path/to/liblapacke \
                -L/path/to/libproshade \
                -Wl,-rpath,/path/to/libgfortran -Wl,-rpath,/path/to/libclipper -Wl,-rpath,/path/to/libfftw3 -Wl,-rpath,/path/to/softlib \
                -Wl,-rpath,/path/to/librvapi -Wl,-rpath,/path/to/liblapacke -Wl,-rpath,/path/to/libproshade \
                -lclipper-ccp4 -lclipper-cif -lclipper-minimol -lclipper-mmdb -lclipper-cns -lclipper-phs -lclipper-contrib -lclipper-core \
                -lccp4c -lmmdb2 -lfftw3 -llapacke -llapack -lblas -lgfortran -lsoft1 -lrvapi
Where each "path/to/..." text needs to be replaced by the absolute path to the appropriate library.
In order to use the ProSHADE library in your project, please consult the example C++ code (the .cpp files) available in the ./src/examples folder. Generally, once you have included the header file
you need to create the ProSHADE settings object as follows:
The "setUp" object then contains all the default settings, but you need to change any settings that the particular functionality of ProSHADE that you are interested in requires. For example, if you are interested in the descriptor distances between two structures, you need to supply the paths to the two structure files into the setUp->structFiles vector of strings, i.e.:
For a full list of possible settings and their default values, please see the example code for the functionality you require - it starts with all the default values being set (they are set by the constructor, the example code duplicates their setting just so that you can look up what and how can be set). Consequently, the settings object needs to be given as the only argument to the constructor of the ProSHADE run functionality object created as follows:
This line will start the ProSHADE functionality, which will proceed to compute all the values and information as required by the settings object. Once the "run" object is created, it can only be used to extract the results using its public accessor functions, but all computations are complete at this point. To run another ProSHADE function, a new "run" object needs to be created. The list of the accessor functions can be found in the ProSHADE.h file, or by exploring the example code, which always uses and shows all the accessor functions available to the particular ProSHADE functionality that the example showcases. For example, to access the rotation function descriptor value for the previously discussed comparison between two objects, you need to create a vector of doubles and fill it with the following function call:
The vector "rotFunDists" now contains the rotation function distances from the first structure given to the "setUp->structFiles" vector to all other "setUp->structFiles" entries. Finally, do not forget to delete the memory allocated by the ProSHADE objects
Similarly to the ProSHADE library, there are also the Python language modules available (for both, python2 and python3). These modules are produced from the dynamic library using the SWIG automated bindings tool. This makes the compilation and usage of the module easier, but also means that the Python modules can only be obtained when the ProSHADE tool is compiled and linked using the CMake automated approach and there is no simple way of obtaining them when manual installation is attempted. Moreover, the modules are only created when CMake version used to compile the ProSHADE code is greater than 3.1 (because older version do not have the automated SWIG plugin). Therefore, the current CMake file detects the version of your CMake and if it is less than 3.1, it will compile the executable and library, but not the python modules.
Assuming that the Python modules have been installed, they will be avaialbe in the paths supplied to the install.sh script. Consequently, when you start your python session (or in the beginning of the script file), the path to the correct module needs to be supplied to the python interpreter, unless the CMake installation was told to install to the defaul python module path (i.e. the python installation paths were left empty). The following lines show how a module in a location not present in the python module path can be added to a project:
Once the module is imported, it is necessary to create the settings object, which is identical to the setting object discussed in the C++ library section (i.e. Using the ProSHADE library). More specifically, it can be created using the following command:
and consequently its variables can be set to any values required by the user. The object will have the default settings set when it is created; for the details as to which values and to which variables can be assigned, please see the examples available in the ./examples/python folder of the ProSHADE directory. There are, nonetheless, some pecularities about the String and Vector variables in the C++ language and their encoding in the python module. More specifically, the module may fail when direct assignment is made to the setUp.ignoreLs variable (vector of ints); to avoid this issue, the users should use the supplied function setUp.ignoreLsAddValuePy to add any values to the variable (this variable lists all bands which should be ignored when spherical harmonics decomposition is done). The proper assignment can then look like:
Also, when a string value is being handed over to the proshade settings object, it can be done using the python "str()" function. However, when a string is passed to the vector of strings (C++ type) variable called setUp.structFiles, the specifically bound type "proshade.StringList" should be used; this variable type is basically a python list, which can be initialised, assigned and consequently assigned to the proshade settings variable as follows:
Once the user is satisfied with the values supplied to the proshade settings object, proshade functionality can be run. The run is initiated by created a proshade object, constructuor of which takes a single input argument - the proshade settings object. The constructor will then decide which of the functionality of ProSHADE should be executed based on the values supplied in the settings object. It will then proceed to execute this functionality, printing progress to standard output subject to the verbose variable value. It will also save any files into the current working directory. When complete, the constructor will return the execution back to python and the user, but during the execution it will stall the process. To execute the proshade functionality, following command can be issued:
Finally, in order to access the results (outside of written files, which must be read by python code on their own), the proshade object has multiple accessor functions specific for each functionality. In order to see the list of accessor functions available, please consult the example codes (./src/examples/python or ./src/examples/python3) for the particular functionality you require. The example code should showcase and list all accessor functions which are available for a particular functinality.
One particularity about this is the symmetry detection functionality, which does have specialised python accessor functions due to the fact that the C++ versions use vector variables which cannot be trivially accessed from python. Furthermore, some of these functions (those which use vectors of vectors in the C++ library) require a special function to convert their output onto more useful list of lists. These special functions as well as the python functions used to access the symmetry functionality results are demonstrated in the symmetry detection example code availalble in ./src/examples/python/getSymmetry.py.
As ProSHADE is still in development, there may be some changes and undocumented functionality. Also, some bug and problems are to be expected, as not all the functionality has been comprehensively tested as of this version. Therefore, please feel free to contact Michal Tykac ( michal.tykac@gmail.com ) for help and and bug reports.
 1.8.12