We all appreciate how cool worms are and how powerful they are as a model organism, but how do we communicate this to the general public?
This was our starting point when we embarked on designing these activities. We decided to aim the main activities at 7-11 year olds. This is a key age group at our local science festival, but we also reasoned that if you design your material for a younger audience it is easier to adapt upwards to cater for older visitors than the reverse! However, we also felt that it was important to seize the opportunity to explain to tax payers, who fund our research, what we do and why it’s important. For this reason, you will find a “detail” section at the foot of most pages, putting the activity into the context of the research we can do with the humble worm.
We hope our ideas help to inspire you to set up your own public engagement activities! We would love to hear about your ideas and how you’ve used our activities
Below we’ve included some additional information to supplement the workbooks. These recommendations are based on a science festival environment, assuming you have a team of volunteers available for a couple of hours. If you are taking the activities into the classroom as a visiting scientist, we suggest you also look at our page with recommendations for teachers (coming soon!). If you have any questions, don’t hesitate to send us an email through the contact page.
Activities
We have designed the activities as a work book, since this gives participants something to take home and read later, away from the hustle and bustle of a science festival! The workbooks are aimed at 7-11 year olds. With the help of a local primary school teacher, we have carefully considered the age suitability of the content and wording, so you should find this helpful when thinking about the sort of language to use (and the scientific jargon to avoid!). The activities are simple, so should work just as well for younger children, as well as older participants. Encourage parents to get involved too. They can help you engage the children, and can continue to talk about what they learned once they have left.
While there are always some people who like to read everything, it is better if you tell them everything they need to know for the activity – either by taking them through what it says in the workbook step-by-step, or just telling them what they need to know to complete the activity – think about what works best for your setup and each activity.
At the foot of most pages is a section for an older audience, giving more background to the activities, and also to link in with our research: how we use worms as a model organism to advance our understanding of human disease.
Organisation
All three activities can be run at once (if you have enough volunteers), but we recommend participants start with “Meet our worms”. With large crowds this may not be feasible and that is also fine. Having stickers to collect is a great way to motivate kids to do all the activities, especially if you have a “prize” for collecting all of them, e.g. a worm-shaped fluffy bug. We recommend handing the stickers out after children complete the activity. We also found that keeping the empty sticker sheets is useful for estimating numbers of attendees and thus compare the level of participation for each activity. If you are unable to print the custom stickers, we have included a version of the workbook with the worm cartoons drawn into the sticker spot.
Activity 1: Meet our worms!
The aim of this activity is to use a microscope to become familiar with wild type worms, the different life stages, how they move, etc., and then to apply this knowledge to play a mutant matching game, matching various mutants to their descriptive names.
- Microscopes: we have successfully used a variety of microscopes with this activity. If you are hosting the event in your building, then the dissecting microscopes from the lab, normally used to pick C. elegans, will work well. We have also used low-magnification compound microscopes, which we happened to have for another public engagement activity, http://www.educationalmicroscopes.co.uk/westburysp30.html; the plates should fit easily under the objective with the lid on. Both monocular and binocular models are suitable. Regardless of which models you choose, beware of potential hazards, such as electrical, trip hazard from cables, burn from hot light source etc. For these reasons, cordless microscopes are a great investment if you have the budget. We particularly like the Motic ST-36C-6LED (approx. 200GBP, http://www.moticeurope.com/product/education/classic-line/st-30-series/).
- Worm strains: All worm strains are available to order through the CGC, but you could use other strains with the desired phenotypes. Email us if you need specific strain recommendations.
- We labelled the mutants strains with the letters A-E, but you can make up your own key if you wish. Consider the labelling order. For example, you could make A and B relatively easy to identify (Rol; Dpy; Lon), keeping the slightly harder ones for later.
- We suggest picking plates three, four and five days before the event. We found picking 2 adults, 2 L4s, and 2 L1s ensured a good range of all ages on the day without the plates being starved. Picking on multiple days gives you flexibility as some strains grow faster than others (and ensures spares in the event of contamination!). Also, some phenotypes (such as Egl and Dpy) are easier to see with older animals. For example, frequently children identify the Egl worms because they have fewer eggs and younger worms on the plate, compared to comparably staged N2s.
- Look at the wild type first. Encourage them to look at the way they move; the different life stages, including eggs; what we grow them on etc.
- Keep the lids on the plates. If you notice condensation, wipe the lid with tissue, then secure it again with spare parafilm.
- Next look at the mutants and match them to the description. Some (e.g. rol, lon) are easy to spot. egl may be more difficult – the older adults will have more eggs accumulating in the uterus.
- Store an answer key in an envelope for volunteers. We also include notes about how mutations in specific genes lead to these phenotypes (rol-6 is a mutation in a cuticular collagen, etc.) for when people ask.
Activity 2: using senses to find food.
The board games. The message here is that, like us, worms have senses (touch, taste and smell) and they use these to find food. Without senses it is very hard, and energy consuming, to find food!
- Game boards: We have two different boards printed out on a 2 x 2 metre cushion floor-mat material, so children can stand on the squares and navigate the board themselves. You could use other, cheaper, materials, but remember to think about safety and how to secure the board to the floor. You can also use the board as a table-top game and use a worm token to navigate the board. There are two game boards, with different size “smell” zones (see below). The purpose of this is to highlight how having more sensitive senses increases the likelihood of finding food, and therefore surviving. However, you could choose to simplify the game by having only one board. If you use both, then the scoreboard is useful to look at the distribution of successful vs. unsuccessful attempts to reach the sweets in less than 30 turns.
- The person playing the game is a hungry worm, looking for food (the sweets square). At the start of the board game, in the green zone, they have to imagine that they can’t use their senses (e.g. they are too far away to smell the food), so they need to use random search – they roll the dice to determine how they move. Once they get to the yellow zone, they can use their senses (e.g. smell the food), so they no longer need the dice, but instead choose how to move, to get closer to the food.
- They can only have 30 turns. On the more challenging board, it can sometimes take over 100 turns to navigate to the end! By limiting it to 30, more children will be able to participate, but they still get the message that it takes a long time. Ask participants if they think 30 turns will be enough.
- Use a tally counter to count the number of moves (enlist the help of siblings or parents to roll the dice, and keep count of the turns).
- Results chart: help them to add their result to the chart, give them a sweet and a sticker. Explain the difference between the two boards -the larger yellow zone on board B represents the ability to sense the food better, so the worm starts to detect it when it is further away. You should find that it is dramatically easier to get there in 30 turns. You could talk about the importance of not spending too much energy finding food, and with older participants you could even talk (in simple language) about selective advantage.
Activity 3: What happens when worms get old?
The message from this activity is that, like us, worms change as they get older, so we can use them to help us understand aging, and age-related diseases like Alzheimers and Parkinsons.
- We use 2 computers for this. The first computer has three videos: young wild-type, old wild-type and old long-lived (daf-2). The second screen consists of two videos: young fluorescent worms and old fluorescent worms. Put all of the videos on “Loop” and set them side by side with the same size window. Explain the differences to a group no larger than five to allow each person to interact and participate.
- They will first look at videos of young and old worms, to compare how they look and move. Try to ask them to explain what they see on the screen and how it is similar to older humans. Then compare with old daf-2 (long living) worms, which are the same age as the old wild-type animals, but look much younger.
- In the second part (on the other computer screen), they are looking at the effects of expressing an aggregating protein (actually a polyglutamine repeat, a worm Huntington’s disease model). This worm strain has a yellow fluorescent protein (YFP) tag attached to the polyglutamine repeat (which is seen through green channel) along its body wall muscle. The videos show the accumulation of aggregated proteins with age, seen as green puncta (dots). Participants are asked to compare the young and aging green worms and describe how their movement is significantly affected. After this, ask participants to draw the changes in the green pattern.
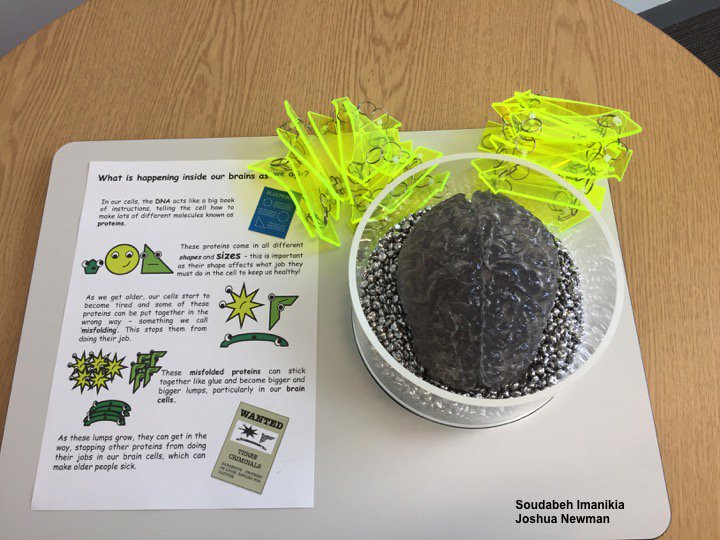
Note: We use a 3D model of the human brain (to scale) and a simple green/yellow-coloured model of protein structure (a chain of Beta sheets) to aid and simplify some of the concepts. This allowed us to engage and interact better with the audience in a more hands-on way (see below). Consider using similar visual aids to enhance the clarity of the activity.
